Situation : 에러에도 200을 응답하는 외부 API
지각 방지 서비스 오디에서는 A지점에서 B지점까지의 대중교통 소요시간을 측정하기 위해 ODsay API를 활용하였습니다. 외부 API를 활용하면서 외부 API에서 에러를 반환하는 상황에 대한 핸들링도 자연스레 신경을 써야했습니다.
처음에는 자연스레 ResponseErrorHandler를 만들어서 해결하려 했습니다. 밸덩 글에 수록된 ResponseErrorHandler의 예시를 보겠습니다.
@Component
public class RestTemplateResponseErrorHandler implements ResponseErrorHandler {

    //에러인지 판단
    @Override
    public boolean hasError(ClientHttpResponse httpResponse) throws IOException {
        return httpResponse.getStatusCode().is5xxServerError() ||
            httpResponse.getStatusCode().is4xxClientError();
    }

    @Override
    public void handleError(ClientHttpResponse httpResponse) throws IOException {
        if (httpResponse.getStatusCode().is5xxServerError()) {
            //Handle SERVER_ERROR
            throw new HttpClientErrorException(httpResponse.getStatusCode());
        } else if (httpResponse.getStatusCode().is4xxClientError()) {
            //Handle CLIENT_ERROR
            if (httpResponse.getStatusCode() == HttpStatus.NOT_FOUND) {
                throw new NotFoundException();
            }
        }
    }
}
is5XXServerError, is4XXClientError 를 통해 각각 클라이언트 에러, 서버 에러를 판단하여 처리해주고 있습니다. 이렇듯 ResponseErrorHandler는 외부 api가 400과 500 에러를 던져주는 상황을 핸들링할 수 있습니다.
그럼 만약 외부 API가 에러 상황임에도 불구하고 상태 코드 200을 던져주면 어떻게 할까요?
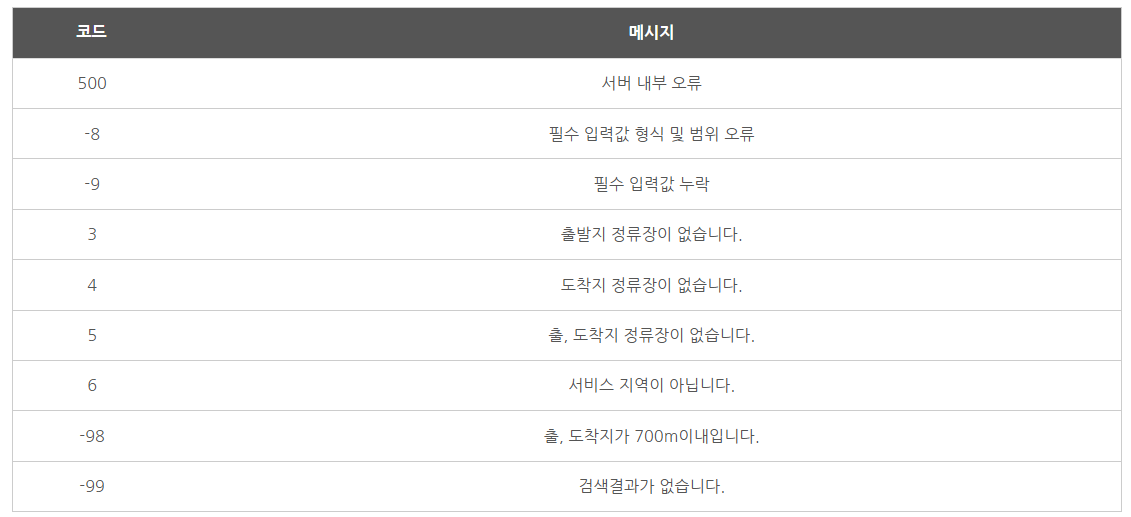
ODsay API는 상태코드 200과 함께 에러 객체를 반환하고 있었습니다.

예를 들어 출/도착지가 700m 이내인 상황에서 상태코드 200과 함께 다음과 같은 에러 객체가 반환되었습니다.
{
  "error": {
    "msg": "출, 도착지가 700m이내입니다.",
    "code": "-98"
  }
}
서버에러가 나면 상태코드 200과 함께 다음과 같이 반환해주었습니다.
{
  "error": [
    {
      "code": "500",
      "message": "[ApiKeyAuthFailed] ApiKey authentication failed."
    }
  ]
}
문제는 위의 json 응답에서 볼 수 있다시피, 어떤 응답에서는 에러 메시지가 msg로, 어떤 응답에서는 message로 필드명이 가변적인 응답객체를 반환해주었습니다.
그럼 간단하게 ResponseErrorHandler에서 ResponseBody를 까보면 되지 않을까 싶었지만, ResponseErrorHandler에서 body를 까서 스트림을 소모하는 순간, resclient가 반환받은 service 코드에서는 body가 조회되지 않는 상황이었습니다.
Task : 각 상황을 분기하여 외부 API 핸들링하기
결국 API 가이드 문서에 따라 각 상황에 맞는 외부 API 응답을 개발자가 분기처리해주어야했습니다.
이를 기반으로 다음과 같은 task를 정해보았습니다.
1) 가변적인 에러 객체 필드명 대응하기
: 어떤 객체에서는 에러메시지가 message이고, 어떤 응답에서는 msg인 상황에 대응하기
2) 역직렬화 과정에서 어떤 응답인지 알아채기
: 스트림을 한번만 소모하면서 어떤 응답인지 분기하기
: 정상응답일 경우 -> 소요시간 반환
: 에러일 경우 -> 에러 반환
Action: 커스텀 역직렬화 도구로 응답 분기하기
1) RestClient 내부 원리 : HttpMessageConvertor를 통한 역직렬화
역직렬화 과정에서 어떤 응답인지를 알아채기 위해서는 RestClient가 API 응답을 수신했을 경우, 어떤 과정을 통해 역직렬화가 되는지 이해할 필요가 있었습니다. RestClient는 RestTemplate 스펙을 기반으로 개발되었기에 RestTemplate의 외부 API 요청/응답 과정에 대해 알아봅시다.

1) 애플리케이션이 RestTemplate으로 api 호출
2) HttpMessageConverter로 Object를 RequestBody에 담을 수 있는 형태로 변환
3) ClientHttpRequestFactory를 통해 ClientHttpRequest를 만들어 요청을 보냄
4) ClientHttpRequest가 요청 메시지를 만들어 Rest Api 호출
5) 오류 발생 시 >> ResponseErrorHandler가 처리
6) 정상 응답 시 >> ClientHttpResponse에서 응답을 가져옴
7) HttpMessageConverter로 응답 데이터를 다시 Object로 변환해준다
8) 애플리케이션이 자바 Object를 반환받음
여기서 주목해야 하는 과정은 7번 역직렬화 과정입니다. 즉, RestClient는 HttpMessageConverter로 직렬/역직렬화 과정을 거치고 있었습니다.
2) HttpMessageConverter 이해하기 : 내부적으로 ObjectMapper 활용
HttpMessageConvertor는 스프링 컨텍스트 내에서 Http message Body의 직렬/역직렬화를 담당합니다. 인터페이스로 선언되어 있기에 데이터 형식에 따라 다양한 구현체가 존재합니다. 그중 Json변환을 담당하는 것은MappingJackson2HttpMessageConverter입니다.
그럼 MappingJackson2HttpMessageConverter에 대해 내부코드를 뜯어보겠습니다.
MappingJackson2HttpMessageConverter는 AbstractJackson2HttpMessageConverter를 상속받고 있습니다.

상위 클래스인 AbstractJackson2HttpMessageConverter 내부로 들어가보면 필드인 ObjectMapper를 통해 역직렬화 과정이 수행되고 있는 로직들을 발견할 수 있습니다.

그중 ObjectMapper를 고르는 selectObjectMapper를 살펴보면 objectMapperRegistrations에서 해당 타입을 역직렬화 할 수 있는 objectMapper를 판별하고, 없다면 defaultObjectMapper를 반환하고 있었습니다.
@Nullable
private ObjectMapper selectObjectMapper(Class<?> targetType, @Nullable MediaType targetMediaType) {
    if (targetMediaType != null && !CollectionUtils.isEmpty(this.objectMapperRegistrations)) {
        Iterator var3 = this.getObjectMapperRegistrations().entrySet().iterator();

        Map.Entry typeEntry;
        do {
            if (!var3.hasNext()) {
                return this.defaultObjectMapper;
            }

            typeEntry = (Map.Entry)var3.next();
        } while(!((Class)typeEntry.getKey()).isAssignableFrom(targetType));

        Iterator var5 = ((Map)typeEntry.getValue()).entrySet().iterator();

        Map.Entry objectMapperEntry;
        do {
            if (!var5.hasNext()) {
                return null;
            }

            objectMapperEntry = (Map.Entry)var5.next();
        } while(!((MediaType)objectMapperEntry.getKey()).includes(targetMediaType));

        return (ObjectMapper)objectMapperEntry.getValue();
    } else {
        return this.defaultObjectMapper;
    }
}
그렇다면 우리가 원하는 로직으로 역직렬화를 하기 위해서 해야하는 태스크가 더욱 좁혀졌습니다.
Odsay로부터 응답을 받는 특정 객체로 역직렬화할때 필요한 ObjectMapper를 커스터마이즈하여 objectMapperRegistrations에 등록해주면 되는 것입니다.
3) 역직렬화 과정 커스터마이즈하기 : JsonDeserializer
역직렬화 과정 커스터마이즈와 관한 밸덩글을 기반으로 하나씩 역직렬화 과정을 커스터마이즈해보았습니다.
public record OdsayResponse(
        Optional<String> code, //에러일 경우 > 에러 코드
        Optional<String> message, //에러일 경우 > 에러 메시지
        OptionalLong minutes //정상응답일 경우 > 소요시간
) {

}
먼저 Odsay응답 객체를 에러 응답과 정상응답을 모두 포괄할 수 있도록 구현하였습니다. 이 하나의 객체는 에러 응답과 정상응답을 모두 포괄해야 하므로 Optional 필드를 가지고 있습니다. 다만 자바에서는 Optional이 반환형이 아닌 필드에서는 지양하는 것을 권장하기에 조금 아쉬운 구현 정책이기도 하였습니다.
@JsonComponent
public class OdsayResponseDeserializer extends JsonDeserializer<OdsayResponse> {

    @Override
    public OdsayResponse deserialize(JsonParser jsonParser, DeserializationContext deserializationContext) {
        //분기 처리
    }
}
다음으로 JsonDeserializer를 구현하여 커스텀 역직렬화 도구를 만들었습니다.
 private Optional<String> find(JsonNode node, String... fieldName) {
        for (String field : fieldName) {
            JsonNode nodeName = node.findPath(field);
            if (!nodeName.isMissingNode()) {
                return Optional.of(nodeName.textValue()); //필드명이 존재 O
            }
        }
        return Optional.empty(); //필드명이 존재 X
 }
특히 가변적인 필드명에 대해서는 가변 파라미터를 통해 해당 응답을 판단하도록 분기하였습니다. 즉 에러 메시지의 경우 msg나 message 중 하나가 존재한다면 바인딩되도록 하였습니다.
@JsonComponent
public class OdsayResponseDeserializer extends JsonDeserializer<OdsayResponse> {

     //내용 동일
}
이후, @JsonComponent를 통해 전역적으로 OdsayResponse 객체의 경우 해당 역직렬화 도구를 사용하겠음을 선언해주었습니다. 이제 OdsayResponseDeserializer가 ObjectMapper 풀에 등록되어 HttpMessageConverter 내에서 우리가 작성한 역직렬화 로직을 거치도록 한 것입니다.
이로서 만들게 된 최종 역직렬화 도구의 모습은 다음과 같습니다.
@JsonComponent
public class OdsayResponseDeserializer extends JsonDeserializer<OdsayResponse> {

    @Override
    public OdsayResponse deserialize(JsonParser jsonParser, DeserializationContext deserializationContext) {
        try {
            JsonNode node = jsonParser.getCodec()
                    .readTree(jsonParser);
            return parse(node);
        } catch (IOException exception) {
            throw new OdyServerErrorException(exception.getMessage());
        }
    }

    private OdsayResponse parse(JsonNode node) {
        Optional<String> code = find(node, "code");
        Optional<String> message = find(node, "message", "msg");
        OptionalLong minutes = findMinutes(node);
        return new OdsayResponse(code, message, minutes);
    }

    private Optional<String> find(JsonNode node, String... fieldName) {
        for (String field : fieldName) {
            JsonNode nodeName = node.findPath(field);
            if (!nodeName.isMissingNode()) {
                return Optional.of(nodeName.textValue());
            }
        }
        return Optional.empty();
    }

    private OptionalLong findMinutes(JsonNode node) {
        try {
            long minutes = node.get("result")
                    .get("path")
                    .get(0)
                    .get("info")
                    .get("totalTime")
                    .asLong();
            return OptionalLong.of(minutes);
        } catch (NullPointerException exception) {
            return OptionalLong.empty();
        }
    }
}
4) 테스트 코드 작성하기 : MockRestServiceServer
이후, 응답이 제대로 역직렬화 되는지를 MockRestServiceServer를 통해 외부 API 서버를 모킹하여 검증하였습니다. 해당 작업은 팀원인 조조가 담당하여 주었습니다.
4-1) Odsay 응답 json 파일로 나눠놓기
먼저 resources 디렉토리 하위에 odsay에 실제로 api를 쏘면서 응답받은 각 상황별 json 응답들을 json 파일로 생성해주었습니다.

4-2) 서버 응답 모킹하기
다음으로 MockRestServiceServer에 대해 해당 응답을 mocking하는 private method를 작성했습니다.
private void setMockServer(Coordinates origin, Coordinates target, String responseClassPath) throws IOException {
    URI requestUri = makeUri(origin, target);
    String response = makeResponseByPath(responseClassPath); //해당 경로에서 응답 파일 읽기

    mockServer.expect(requestTo(requestUri))
            .andExpect(method(HttpMethod.GET))
            .andRespond(withSuccess(response, MediaType.APPLICATION_JSON));
}

private URI makeUri(Coordinates origin, Coordinates target) {
    //외부 API 요청 URI 만드는 로직
}

private String makeResponseByPath(String path) throws IOException {
    return new String(Files.readAllBytes(
            new ClassPathResource(path).getFile().toPath())
    );
}
4-3) 모킹된 응답 결과 통과하는지 검증
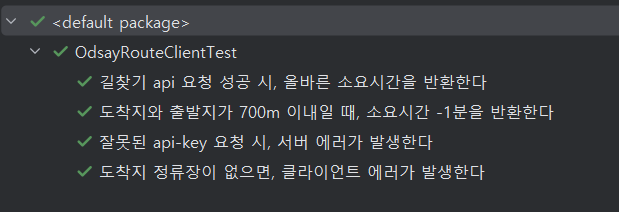
다음으로 각 상황별로 역직렬화 로직이 제대로 동작하는지 모킹된 서버 응답을 기반으로 검증하였습니다. 예를 들어 정상응답을 반환하는 경우는 다음과 같습니다.
@DisplayName("길찾기 api 요청 성공 시, 올바른 소요시간을 반환한다")
@Test
void calculateRouteTimeSuccess() throws IOException {
    Coordinates origin = new Coordinates("37.505419", "127.050817");
    Coordinates target = new Coordinates("37.515253", "127.102895");

    setMockServer(origin, target, "odsay-api-response/successResponse.json");

    RouteTime routeTime = routeClient.calculateRouteTime(origin, target);

    assertThat(routeTime.getMinutes()).isEqualTo(15);
    mockServer.verify();
}
에러를 반환하는 경우는 에러 전환 로직이 제대로 작동하는지 검증하였습니다.
@DisplayName("잘못된 api-key 요청 시, 서버 에러가 발생한다")
@Test
void calculateRouteTimeExceptionWithInvalidApiKey() throws IOException {
    Coordinates origin = new Coordinates("37.505419", "127.050817");
    Coordinates target = new Coordinates("37.515253", "127.102895");

    setMockServer(origin, target, "odsay-api-response/error500Response.json");

    assertThatThrownBy(() -> routeClient.calculateRouteTime(origin, target))
            .isInstanceOf(OdyServerErrorException.class);

    mockServer.verify();
}
모두 정상적으로 통과하는 것을 볼 수 있습니다.

Result : 커스텀 역직렬화 도구를 통한 API 응답 핸들링
결론적을 정리하면 다음과 같습니다.
[정리]
1) 가변적인 에러 객체 필드명 대응하기 > Varargs로 Optional 필드 바인딩하여 해결
2) 역직렬화 과정에서 어떤 응답인지 알아채기 > 커스텀 역직렬화 도구로 해결
그러나, 이번 글에서는 하나씩 해결에 가까워진 과정을 더욱 강조하고 싶습니다.
- RestClient 동작 원리를 통한 역직렬화 도구 탐색
- HttpMessageConverter를 통한 ObjectMapper 해결 키워드 탐색
- Jsondeserializer 커스텀을 통한 문제 해결
- MockRestServiceServer를 통한 구현 검증
명확한 문제정의부터 하나씩 문제의 키워드를 찾아내어 해결했던 과정, 그리고 페어였던 조조와 함께 해당 구현을 테스트를 통해 검증하였던 과정이 인상깊게 남아있던 경험이었습니다.
reference)
https://myvelop.tistory.com/217
스프링의 외부 API 호출, 그리고 RestClient
애플리케이션 외부 API 호출현업에서 외부 API를 호출해야하는 일이 많다. 다른 회사의 서비스(휴대전화 인증, 결제시스템)를 이용할 때 필수적이다. 물론 클라이언트 단에서 외부 API를 호출한다
myvelop.tistory.com
MappingJackson2HttpMessageConverter (Spring Framework 6.2.1 API)
Indicate whether the JSON output by this view should be prefixed with ")]}', ". Default is false. Prefixing the JSON string in this manner is used to help prevent JSON Hijacking. The prefix renders the string syntactically invalid as a script so that it ca
docs.spring.io
https://www.baeldung.com/jackson-deserialization
'프로젝트 > 오디' 카테고리의 다른 글
| [오디 - 폴링 로직 리팩터링] 0. 실험 설계 (0) | 2025.09.19 |
|---|---|
| [오디] 회원 전체가 동시에 탈퇴하는 속도 단축하기 feat) 쿼리 최적화 (8) | 2025.08.16 |
| FCM 알림 비동기 + 이벤트 리스닝으로 리팩터링 하기 - 2편(테스트) (2) | 2024.12.03 |
| FCM 알림 비동기 + 이벤트 리스닝으로 리팩터링 하기 - 1편 (1) | 2024.12.03 |
| 인수 테스트로 사용자 유즈 케이스 파악하기 (0) | 2024.11.17 |


